Difference between revisions of "Getting Started"
| Line 23: | Line 23: | ||
====Cloud Simulator for Network Configuration==== | ====Cloud Simulator for Network Configuration==== | ||
If Meteobridge client cannot connect to your LAN or your LAN does not provide a DHCP service, large LED will not leave fast-blinking mode. To get network settings fixed, you can define the correct network parameters in a simulator in the Internet, which works as follows. | If Meteobridge client cannot connect to your LAN or your LAN does not provide a DHCP service, large LED will not leave fast-blinking mode. To get network settings fixed, you can define the correct network parameters in a simulator in the Internet, which works as follows. | ||
| − | # Please browse to "http://config.meteobridge.com". | + | # Please browse to "http://config.meteobridge.com". There you will find a simulation of the Meteobridge web interface. Please select the "Setup Network" tab and configure settings as needed for your specific network situation. |
# When settings are done, please press "save" and change to "Download" tab which will cause your browser to start downloading a configuration file named "config.tgz". | # When settings are done, please press "save" and change to "Download" tab which will cause your browser to start downloading a configuration file named "config.tgz". | ||
# Please store that file (as is, do not unpack) on a USB stick formatted as FAT and start the Meteobridge with the USB stick plugged into the USB port of Meteobridge. When network settings are right, Meteobridge will stop with slow and fast blinking and turn on the LED constantly. | # Please store that file (as is, do not unpack) on a USB stick formatted as FAT and start the Meteobridge with the USB stick plugged into the USB port of Meteobridge. When network settings are right, Meteobridge will stop with slow and fast blinking and turn on the LED constantly. | ||
Revision as of 19:38, 15 December 2012
To make a Meteobridge of of TP-LINK routers TL-MR3020 or TL-WR703N, you simply habe to install an applicable Meteobridge firmware image. Flashing the firmware ware can be done with the firmware update functions the router's stock firmware does provide. By doing so you will void the TP-LINK warranty, but having the cheap price in mind you will certainly not face a substantial financial risk in the unlikely event that you brick the router.
Contents
Flashing Meteobridge Firmware to TL-MR3020
Please consult the TP-Link manual to understand how to get access with your browser to its web interface. What the manual will tell you is basically that you have to connect your PC/Laptop via ethernet cable, and log in to the router's web interface (IP is 192.168.0.254, login name is "admin", password: "admin"). When you have access to web interface of TL-MR3020, overwrite factory firmware like a regular firmware update by this file. Wait until unit restarts. After that it will be a Meteobridge client in standard configuration receiving an IP from your router in the LAN.
Flashing Meteobridge Firmware to TL-WR703N
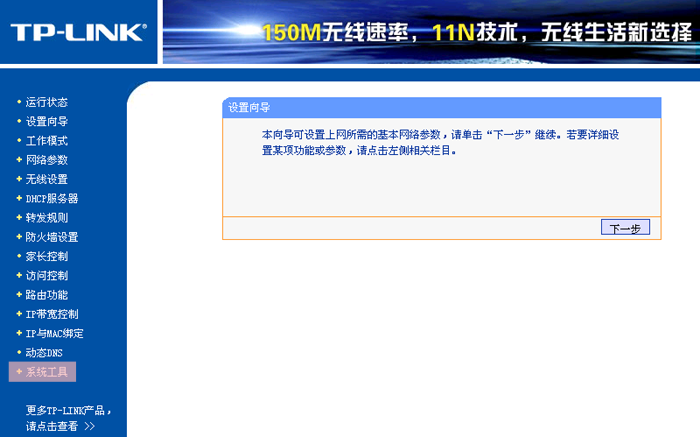
As TL-WR703N does only come with a Chinese web interface, it might be a bit tricky to find the right menu item to initiate firmware update. First you have to login with your browser. To achieve that you have to connect your PC/Laptop via ethernet cable, and log in to the router's web interface (IP is 192.168.1.1, login name is "admin", password: "admin").
When you have access to web interface of TL-WR703N, you select the item at the bottom of the left menu items, marked in light red on the picture below.

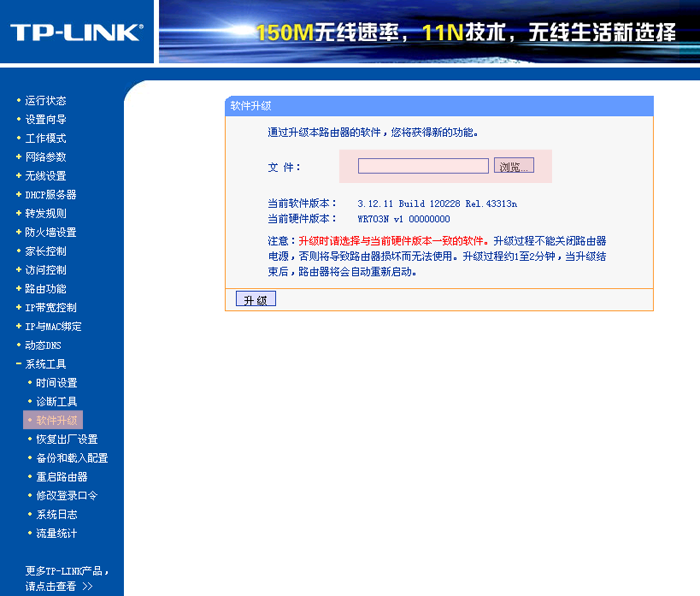
Next you choose sub menu item as marked in light red in the picture below and browse to target file by pressing light red marked file select dialog in the middle of the screen. You find Meteobridge firmware for this device here.

Finally, a "are you sure" dialog will pop up, please press "yes" button and wait until progress bar has reached 100%. Unit will reboot automatically. After reboot it will be a Meteobridge in standard configuration receiving an IP from your router in the LAN.
First Login to Meteobridge
When Meteobridge is connected to your LAN it will try to receive a dynamic IP from your DHCP server during boot. Wait until blinking of the largest LED has stopped. Do a short press on the the transparent pushbutton on top of the large LED (TL-MR3020) or a short press of the reset button behind the pinhole at the back of the unit (TL-WR703N). Now LED will start signaling the unit's IP.
Cloud Simulator for Network Configuration
If Meteobridge client cannot connect to your LAN or your LAN does not provide a DHCP service, large LED will not leave fast-blinking mode. To get network settings fixed, you can define the correct network parameters in a simulator in the Internet, which works as follows.
- Please browse to "http://config.meteobridge.com". There you will find a simulation of the Meteobridge web interface. Please select the "Setup Network" tab and configure settings as needed for your specific network situation.
- When settings are done, please press "save" and change to "Download" tab which will cause your browser to start downloading a configuration file named "config.tgz".
- Please store that file (as is, do not unpack) on a USB stick formatted as FAT and start the Meteobridge with the USB stick plugged into the USB port of Meteobridge. When network settings are right, Meteobridge will stop with slow and fast blinking and turn on the LED constantly.
- You can now remove the USB stick, it is no longer needed.
To make you a bit more familar with openwrt, how it looks like and how to change network settings, we do a walkthrough of the scenario when Meteoplug is started in "WLAN mode" and we are going to configure WLAN settings in order to make it operational in your WLAN.
- When Meteoplug initially boots in WLAN mode it will not be able to complete the full start-up sequence. Download of Meteoplug application components from the Meteoplug cloud will fail, as Meteoplug client can't achieve an Internet connection without WLAN credentials. Therefore large green LED below the transparent pushbutton will not go into a solid green, but will turn into high frequent blinking, which indicates that process of downloading application components from Meteoplug cloud are not finished yet.
- When Meteoplug client is stalled at high frequency blinks of large green LED, directly connect your PC/Laptop configured for dynamic IP (or technical speaking as a "DHCP client") with an ethernet cable.
- Wait until LAN connection establishes and browse to "http://192.168.1.1". You will see this openwrt login screen. File:Openwrt-screen-1.png
- Please log in with password "meteoplug". You will now see an overview screen with lots of details. Please select "Network", "Wifi" tab and press "Scan" button. File:Openwrt-screen-2.png
- openwrt will list all wireless networks in reach. Click "Join Network" for the one you want to join. File:Openwrt-screen-3.png
- Next you will be requested to configure wireless LAN credentials. Please insert "passphrase" and name the network "wlan" for later reference and create a new firewall zone for it, also named "wlan". Press "Submit" when done. File:Openwrt-screen-4.png
- Then openwrt will show a screen like this. please press "Save & Apply" to confirm settings. File:Openwrt-screen-5.png
- Last step is to really connect to the wireless LAN. Please select "Network", "Interfaces" tab and press "Connect" button next to the WLAN you just defined. File:Openwrt-screen-5b.png
- After a few seconds the screen should change and display an IP address for WLAN interface. This is marked with a tranparant red box in the screen dump below. Please remember the IP address, as you need this address when you intend to reach Meteoplug client from within your wireless LAN. File:Openwrt-screen-5c.png
- Now Meteoplug client should get contact to Meteoplug cloud and fast blinking large LED should skip to constant green, which indicates that connection to Meteoplug cloud has been made.
- When everything works as described, you can disconnect the ethernet cable from the Meteoplug client. WLAN setup is done.
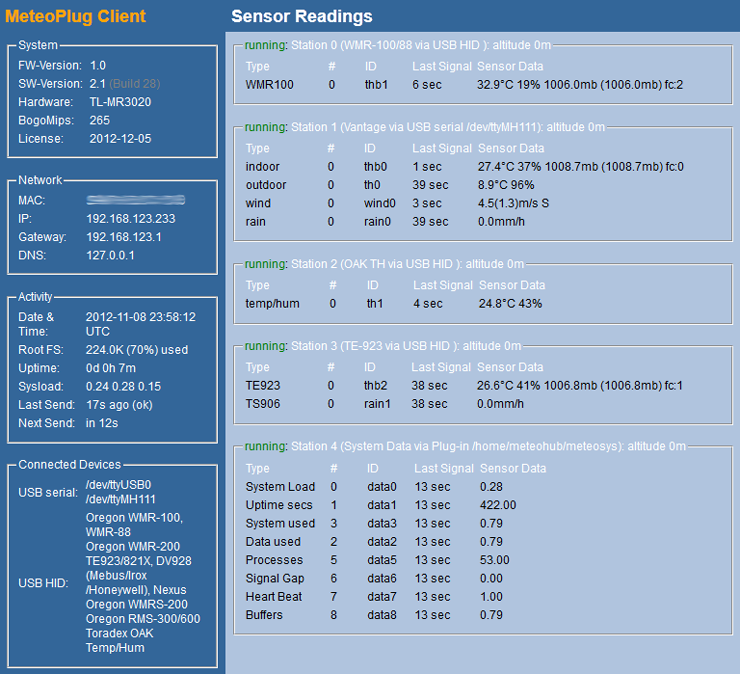
The headline of each sreen inside openwrt includes a push button named "Open Meteoplug Client" to open a screen, where status of data logging and received sensor values can be inspected. This page does not provide great features to display data (this is done by the Meteoplug cloud service in the Internet) but it allows you a quick schek if connection to Meteoplug is fine and if weather station sensors do deliver data.
